5 Lessons I Learned While Creating My First WebSocket-Powered Game
Strongly typing, Debugging, Security and End-to-end encryption.
Self-taught Software Engineer from Singapore (that eventually goes to school for it). Passionate about building new stuff that helps people save time!
In today's post, I want to share with you some of the things I have learned while trying to create my first-ever WebSocket-powered game.
As a web developer, I have always been fascinated by the possibilities of WebSockets, and I was eager to put my skills to the test by creating a web-based game that uses this technology.
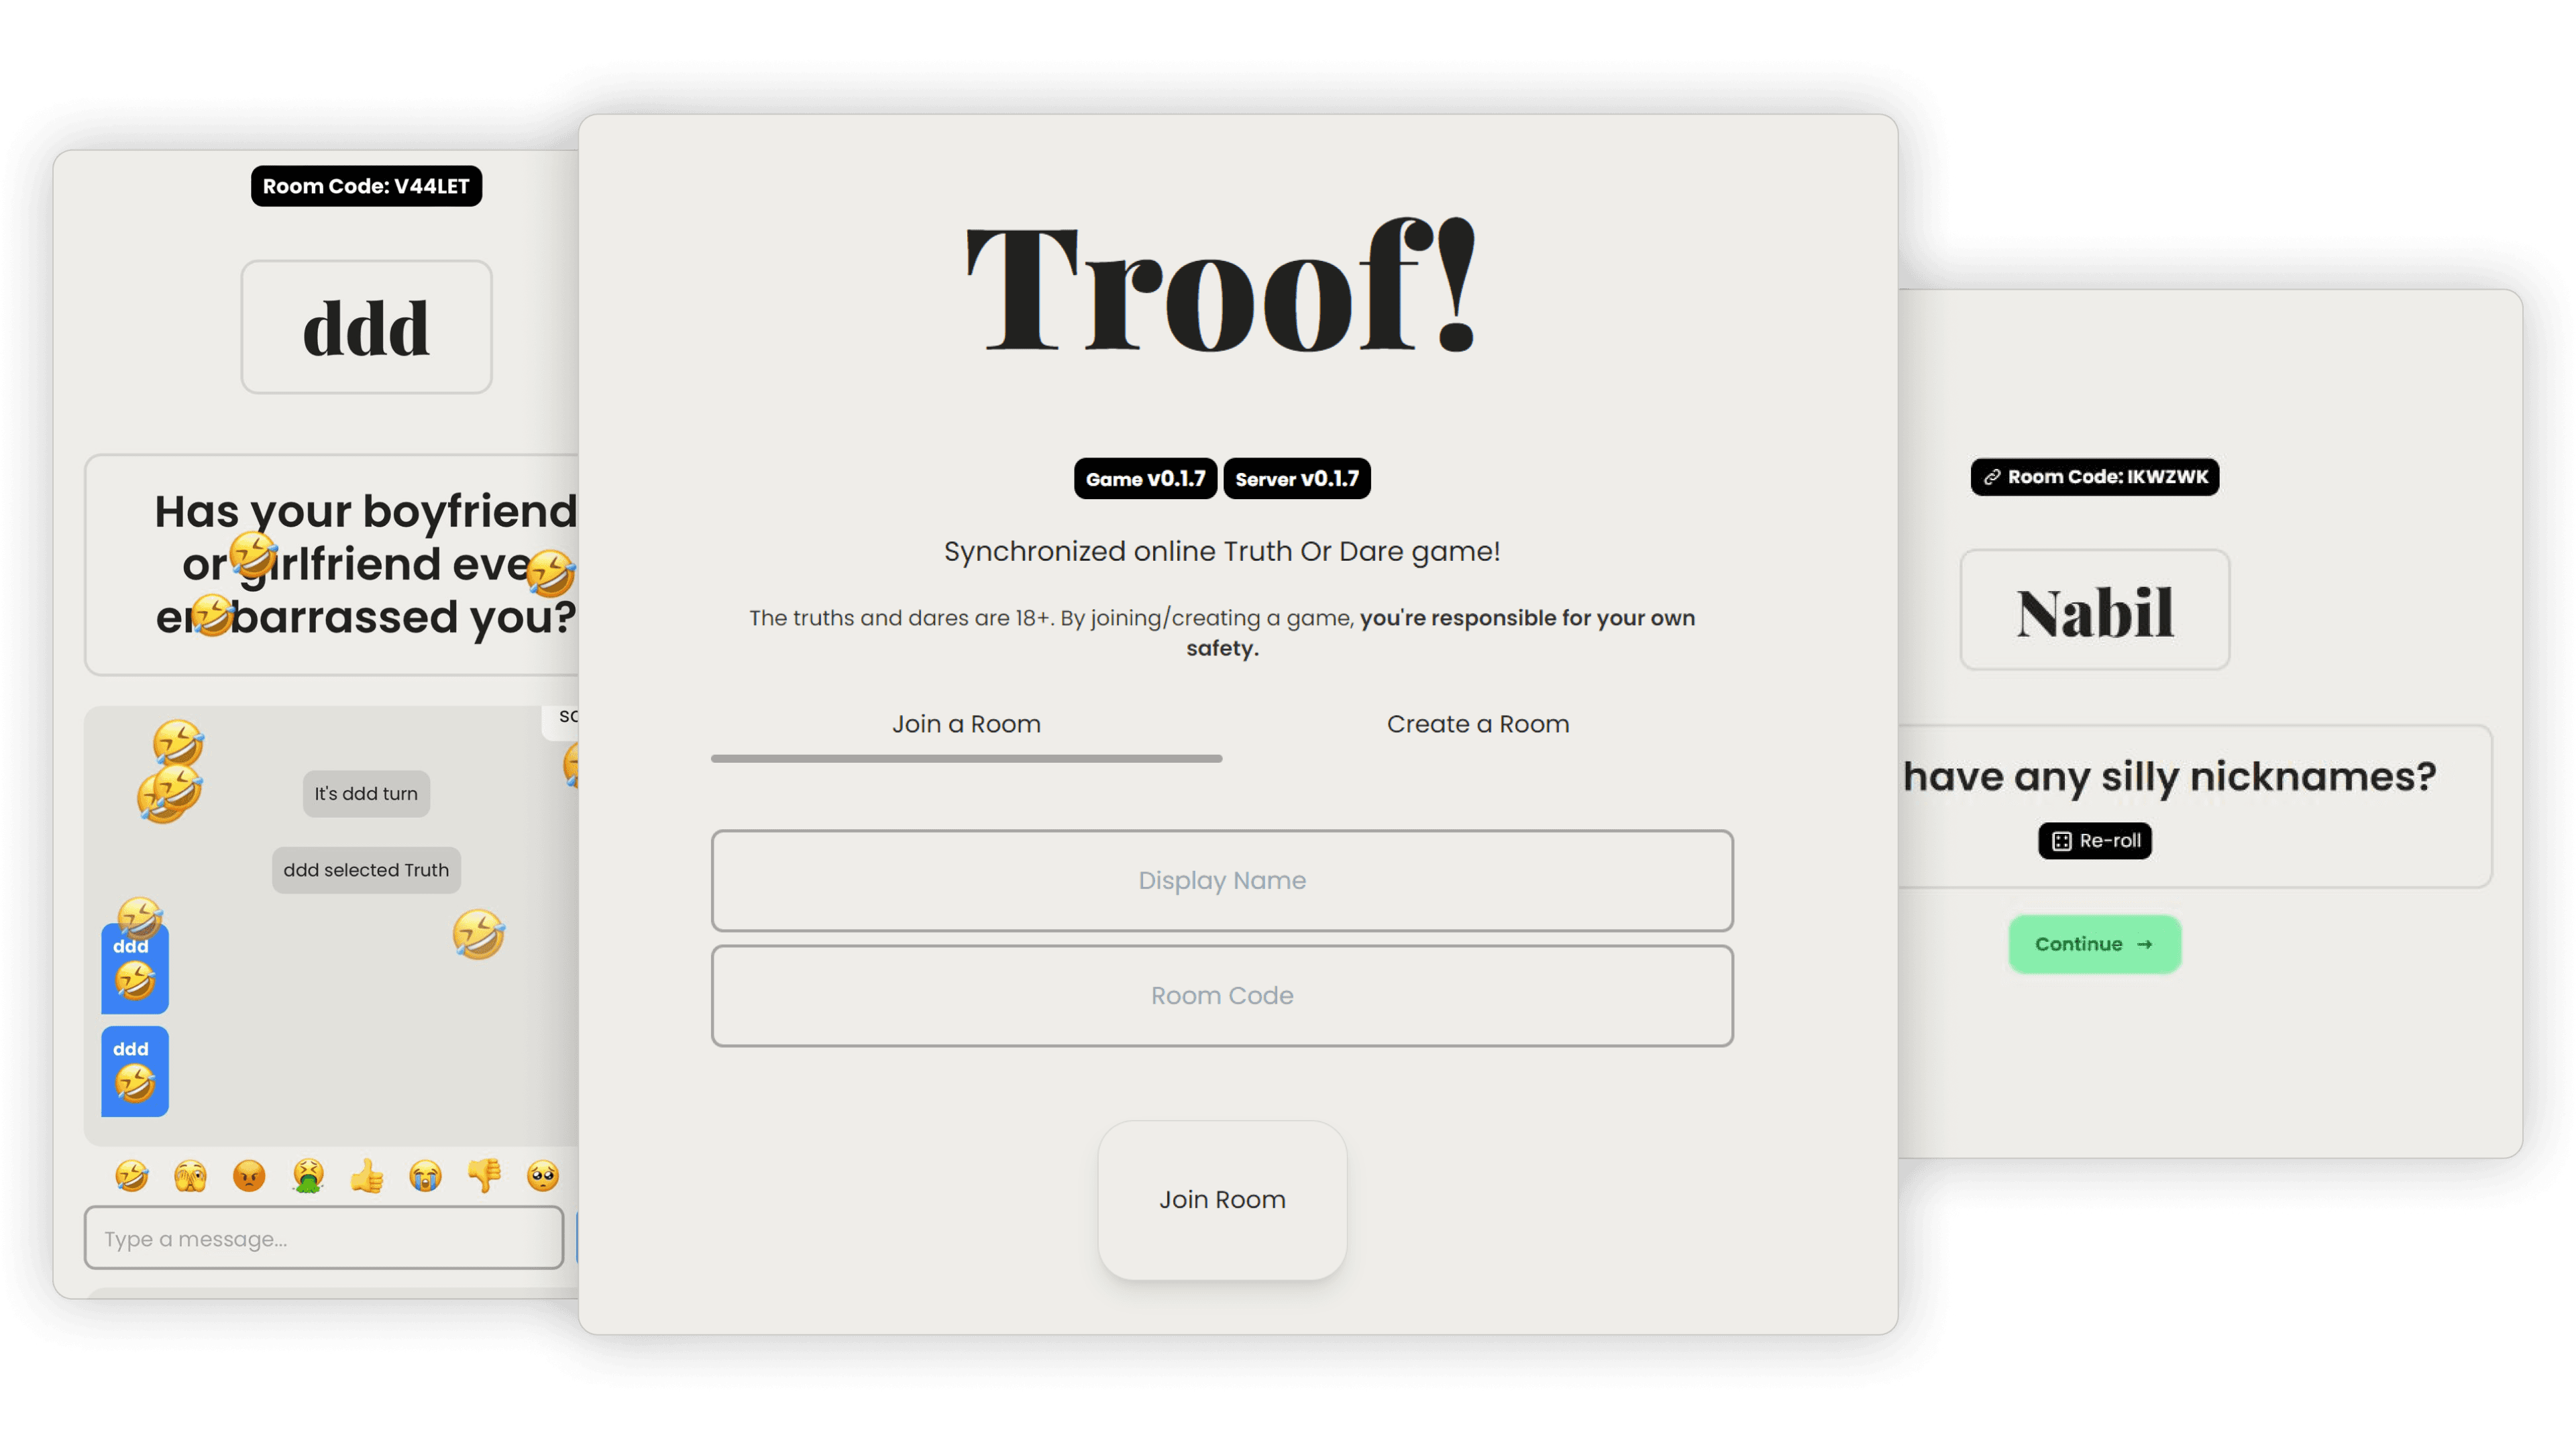
Introducing Troof!
Troof!, the online-based truth or dare game that brings people together through the power of honesty and adventure. In Troof!, players can chat and react to each other's truths and dares, creating a fun and interactive experience that fosters connection and bonding.
You can play Troof! here*:* https://troof.nabilridhwan.com
The inspiration for Troof came about when my friend and I were playing truth or dare over a voice call. One annoying thing was that I had to repeat the question because they were in the middle of doing something else.
This is where the idea for Troof was born! - a truth or dare game that always displays the question to all players in the room, with the added functionality of chat. With Troof, you can play without the need for a voice call and never miss a question again.
The Planning Stage
Scalability?
Initially, I tried putting both my socket.io server together with next.js, but I quickly realized that this would not be scalable.
In order to improve performance and ensure that my application could handle a high volume of users, I decided to move all backend services to their own separate servers.
This allowed me to better manage and optimize my application, and ultimately provide a better user experience.
So Troof now has a frontend hosted on Vercel and a separate backend handling all the little socket.io stuff.
Usage of TypeScript in this Project
I knew from the start that I wanted to use TypeScript for both the front end and back end of my application.
The reason for this is that TypeScript is strongly typed, which means it is less prone to stupid mistakes.
By using TypeScript, I was able to catch errors early on and write cleaner, more reliable code.
Overall, I found that TypeScript greatly improved the development process and helped me create a more stable application.
The Development Stage
Socket.io and TypeScript?
As I continued to develop my application, I realized that socket.io can be used with TypeScript to define how server-to-client and client-to-server events would look like. (Reference: https://socket.io/docs/v4/typescript/).
An example of it would look like this:
export interface ServerToClientEvents {
    [EVENTS.PLAYERS_UPDATE]: (players: Player[]) => void;
    [EVENTS.GAME_UPDATE]: (room: Room) => void;
    [EVENTS.LEFT_GAME]: (playerRemoved: Player) => void;

    [TRUTH_OR_DARE_GAME.INCOMING_DATA]: (log: Log, player: Player) => void;

    [TRUTH_OR_DARE_GAME.LEAVE_GAME]: (room: Room) => void;
    [TRUTH_OR_DARE_GAME.SELECT_TRUTH]: (room: Room) => void;
    [TRUTH_OR_DARE_GAME.SELECT_DARE]: (room: Room) => void;
    [TRUTH_OR_DARE_GAME.CONTINUE]: (log: Log, player: Player) => void;
    [TRUTH_OR_DARE_GAME.JOINED]: (log: Log, player: Player) => void;

    // Messages
    [MESSAGE_EVENTS.MESSAGE_NEW]: (message: MessageUpdate) => void;
    [MESSAGE_EVENTS.MESSAGE_ANSWER]: (message: MessageUpdate) => void;
    [MESSAGE_EVENTS.MESSAGE_REACTION]: (message: MessageUpdate) => void;
    [MESSAGE_EVENTS.MESSAGE_SYSTEM]: (message: SystemMessage) => void;
}
This interface defines how Server to Client events are made. So every io.emit or socket.to().emit() follows the interface structure above.
This interface is then used in the initialization of the socket, as shown below:
const io = new Server<ServerToClientEvents>(server);
This allows TypeScript to scream at us if we give an unexpected payload for an event and also gives us nice auto-completion.
This interface ServerToClientEvents and ClientToServerEvents are the same on both the backend and front end so it gives us really strong code maintainability.
By using socket.io and TypeScript together, I was able to create a more robust and efficient communication system between the client and server.
This helped me avoid common pitfalls and write better, more reliable code.
Clean architecture for Socket.io
I learned to make my code cleaner by following best practices
io.on("connection", (socket) => {
    console.log("Current active sockets: ", io.engine.clientsCount);
    console.log(`A user connected (${socket.id})`);

    roomHandler(io, socket);
    gameHandler(io, socket);
    messageHandler(io, socket);

    socket.on("disconnect", () => {
        console.log(`A user disconnected (${socket.id})`);
    });
});
In each of the "handler" files, I pass in io and socket as such:
In roomHandler.ts,
const roomHandler = (
    io: Server<ClientToServerEvents, ServerToClientEvents>,
    socket: Socket<ClientToServerEvents, ServerToClientEvents>
) => {
    console.log("Registered room handler");

    const joinRoomHandler = async (obj: RoomIDObject) => {
        // Server to Client events
        io.emit('...', {});
    };

    // Listener here (Client to Server events)
    socket.on(EVENTS.JOIN_ROOM, joinRoomHandler);
}
Notice that I specifically cast the io and socket to use my generics while also highlighting where the client-to-server and server-to-client events happen.
The troubles with using Socket.io with Next.js
One of the challenges I faced during development was dealing with socket.io and next.js. Every time a user visited a new page, they would use a new connection of socket, which caused performance issues and made it difficult to manage multiple connections.
The useSocket hook
The useSocket hook is meant to be a simple hook that can be used by every file that needs a socket instance. It checks if there is already a socket or if useEffect already ran, in which it will return.
export function useSocket() {
    const [socket, setSocket] = useState<Socket<
        ServerToClientEvents,
        ClientToServerEvents
    > | null>(null);

    const [effectRan, setEffectRan] = useState(false);

    useEffect(() => {
        console.log("USESOCKET: USEEFFECT RUNNING");
        if (effectRan || socket) return;
        clientSocketInitializer();

        return () => {
            if (socket) {
                console.log("USESOCKET: Disconnecting socket");
                (socket as Socket).disconnect();
            }
        };
    }, [socket, effectRan]);

    const clientSocketInitializer = async () => {
        console.log("USESOCKET: Client Socket Initializer Ran");
        const url = process.env.NEXT_PUBLIC_SERVICES_URL!;
        const s = io(url);
        setSocket(s);
        setEffectRan(true);
    };

    return { socket };
}
This hook is only used in the context I created:
export const SocketProvider = ({ children }: SocketProviderProps) => {
    const { socket } = useSocket();
    return (
        <>
            <SocketProviderContext.Provider value={socket}>
                {children}
            </SocketProviderContext.Provider>
        </>
    );
};
However, despite my efforts, I was unable to find a satisfactory workaround for this problem. I am still looking for solutions to improve the performance and reliability of socket.io in next.js.
Not everything can be replicated in development!
One challenge I faced during deployment was the issue of users continuously pressing the "continue" button. This problem was discovered while testing and playing with my friends.
Since the backend was regionally far, it would take a few hundred milliseconds to process each request. This led to the game skipping multiple users' turns.
To address this problem, we implemented a simple solution - a loading state that would be set to true when the user clicks on continue and then set to false when new data is received from the backend socket (in this case, the next player).
This allowed us to prevent the game from skipping turns and provided a smoother, more enjoyable user experience.
It is important to test your application after deployment in order to ensure that it is performing at its best. Testing allows you to measure the speed of the backend response and get a real-world user experience. By regularly testing your application, you can identify and address any performance issues before they become major problems. This will help you provide a better user experience and improve the overall stability of your application.
The Affair of Messages and Real-time communication.
In a recent new feature that is released to Troof! I added a feature where people can reply to other people's messages.
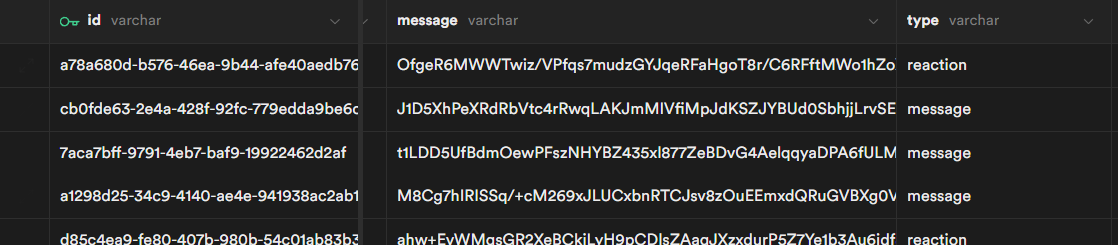
This feature means that the chat table needs to be changed. So I added a new column called reply_to which is an ID of chat.
So if I have a chat ID of 5 saying "hello", and a chat ID that replies to 5 with "hey".
The table would look something like this:
| ID | content | reply_to |
| 5 | hello | null |
| 6 | hey | 5 |
However, it means that for every message we sent, we need to wait for the database to finish writing (which eats time), and then we will know what the ID of the "hello" message is.
The OLD way is shown below
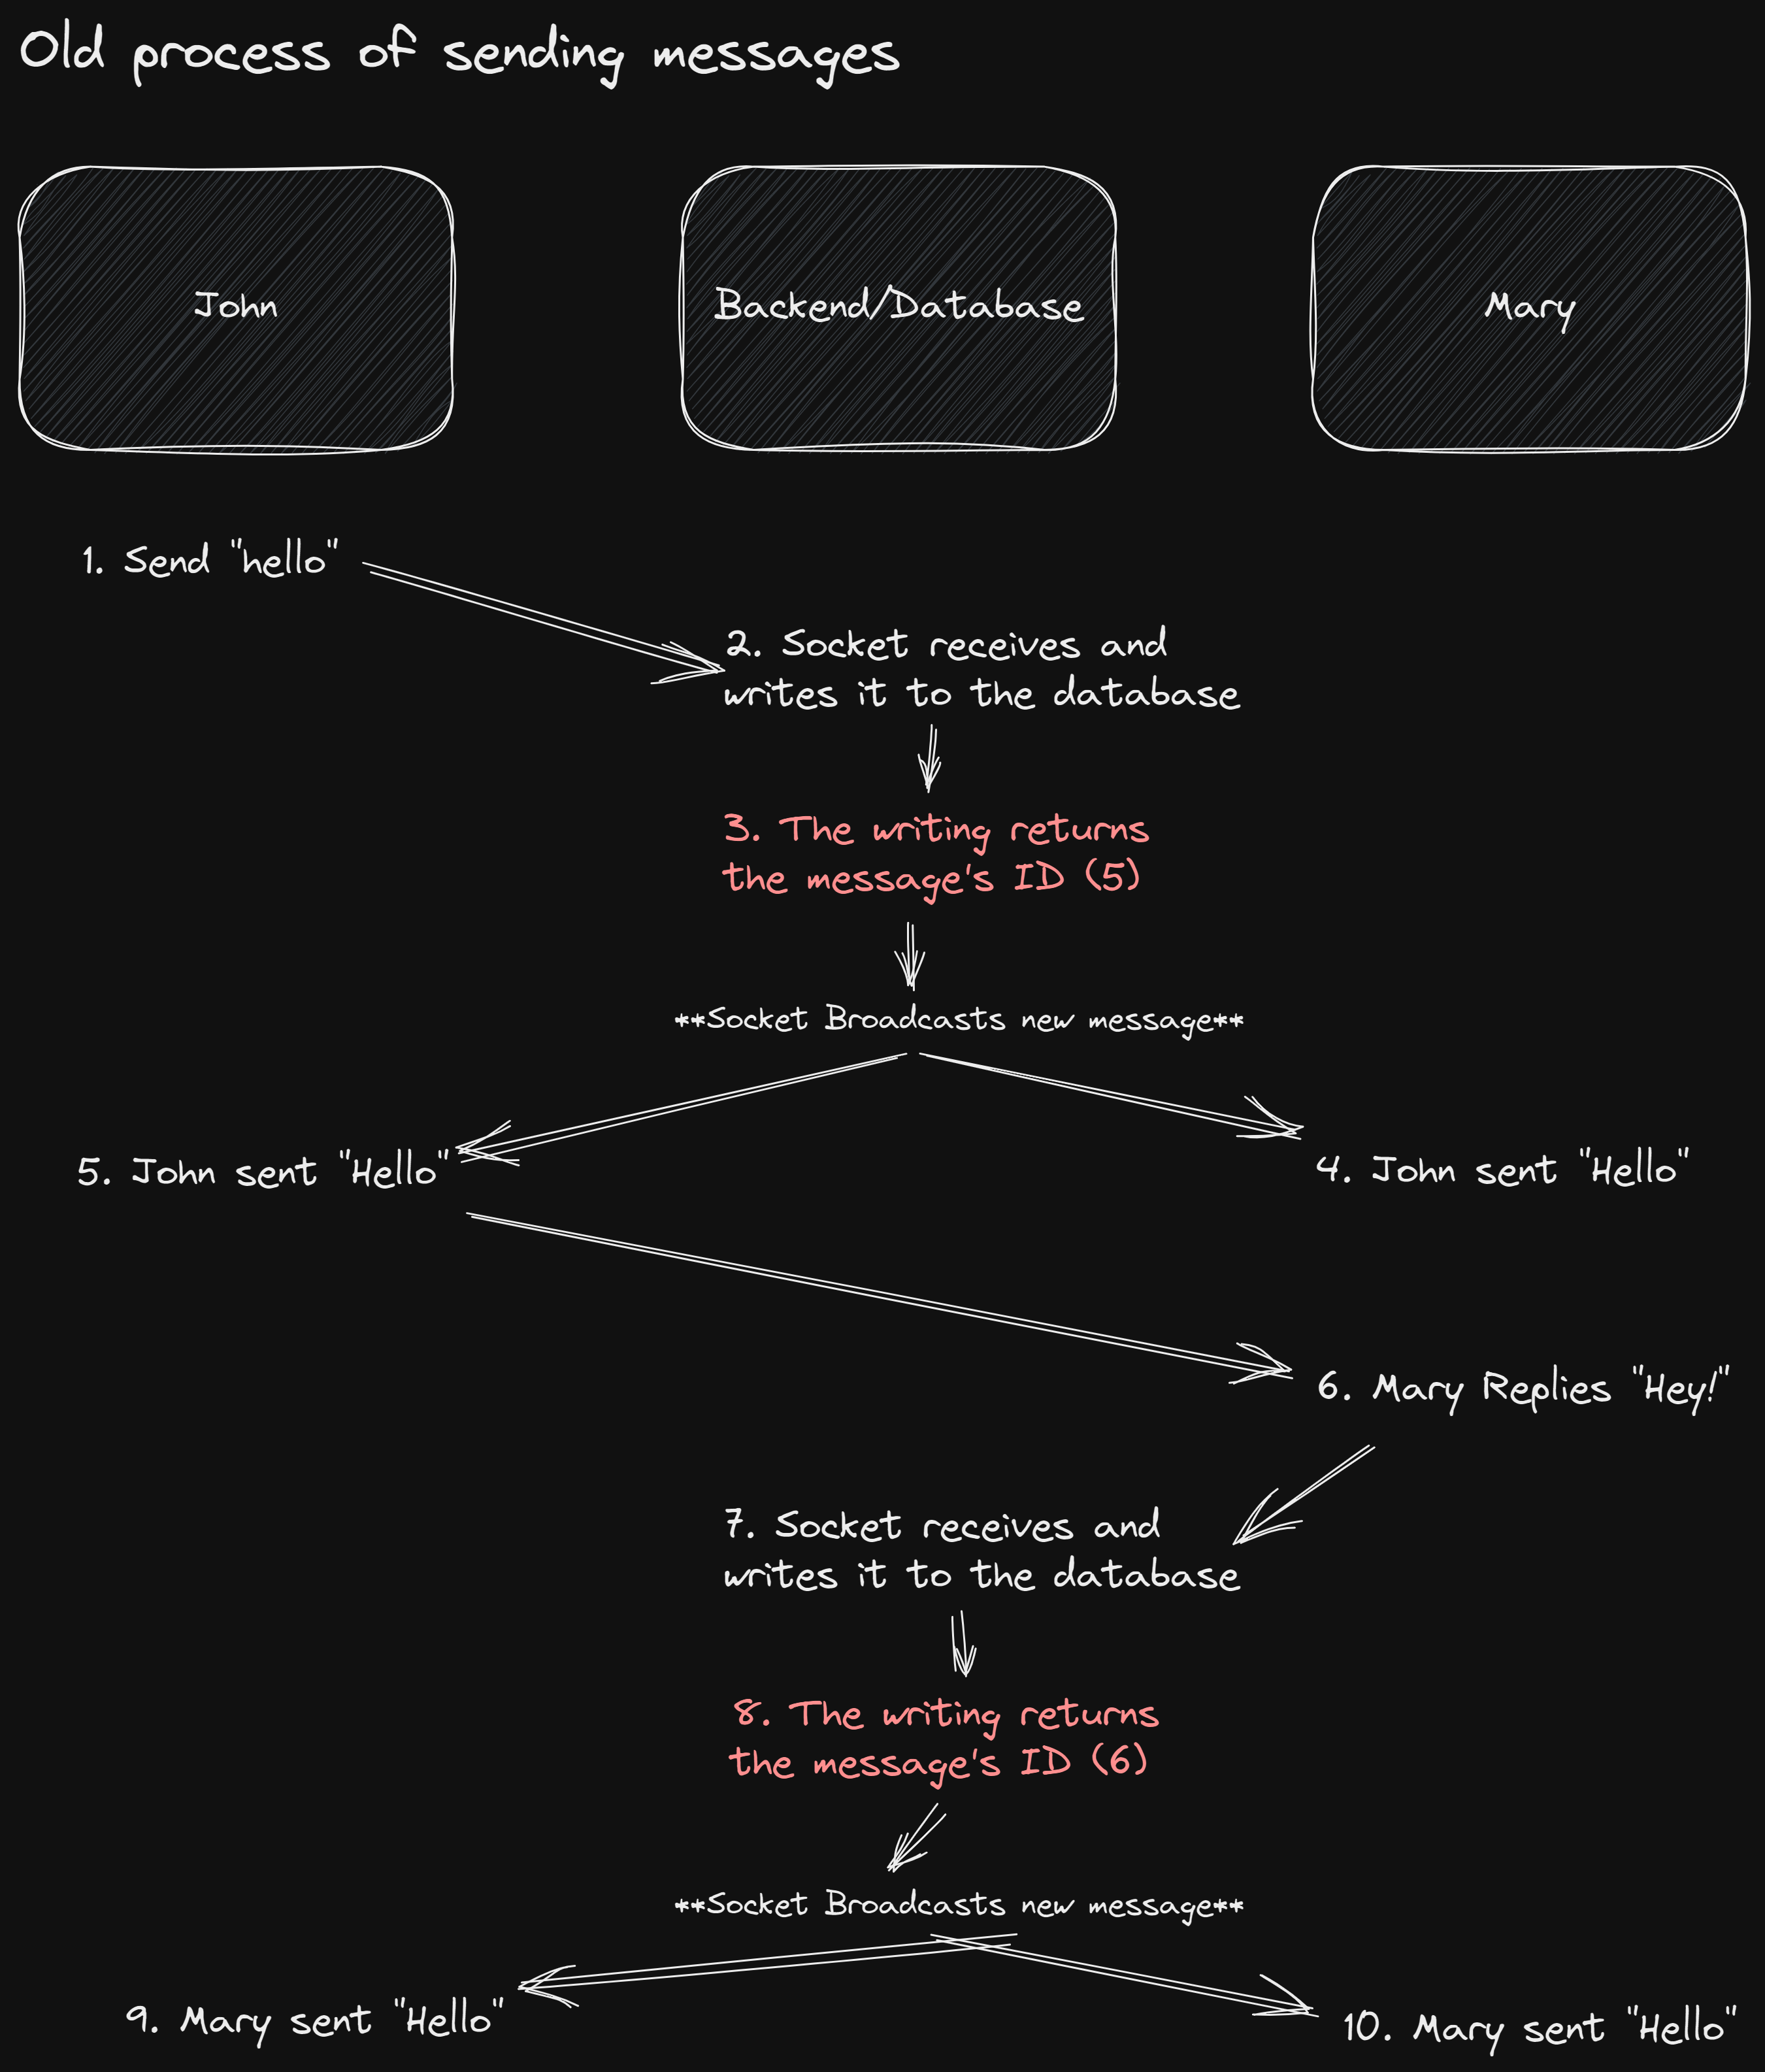
The items in red are what are taking up a lot of time.
So I sat down pondered and wondered to myself "what is a better way for users to have that real-time feeling and also have the items written to the databases at the end of the day?"
Then I had an idea. What if I replaced the chat's ID with UUID and then on the backend, generate a UUID and write it to the database? This way, I do not need to wait for the writing to be complete because I will be the one supplying the ID.
So here it is, the NEW way:
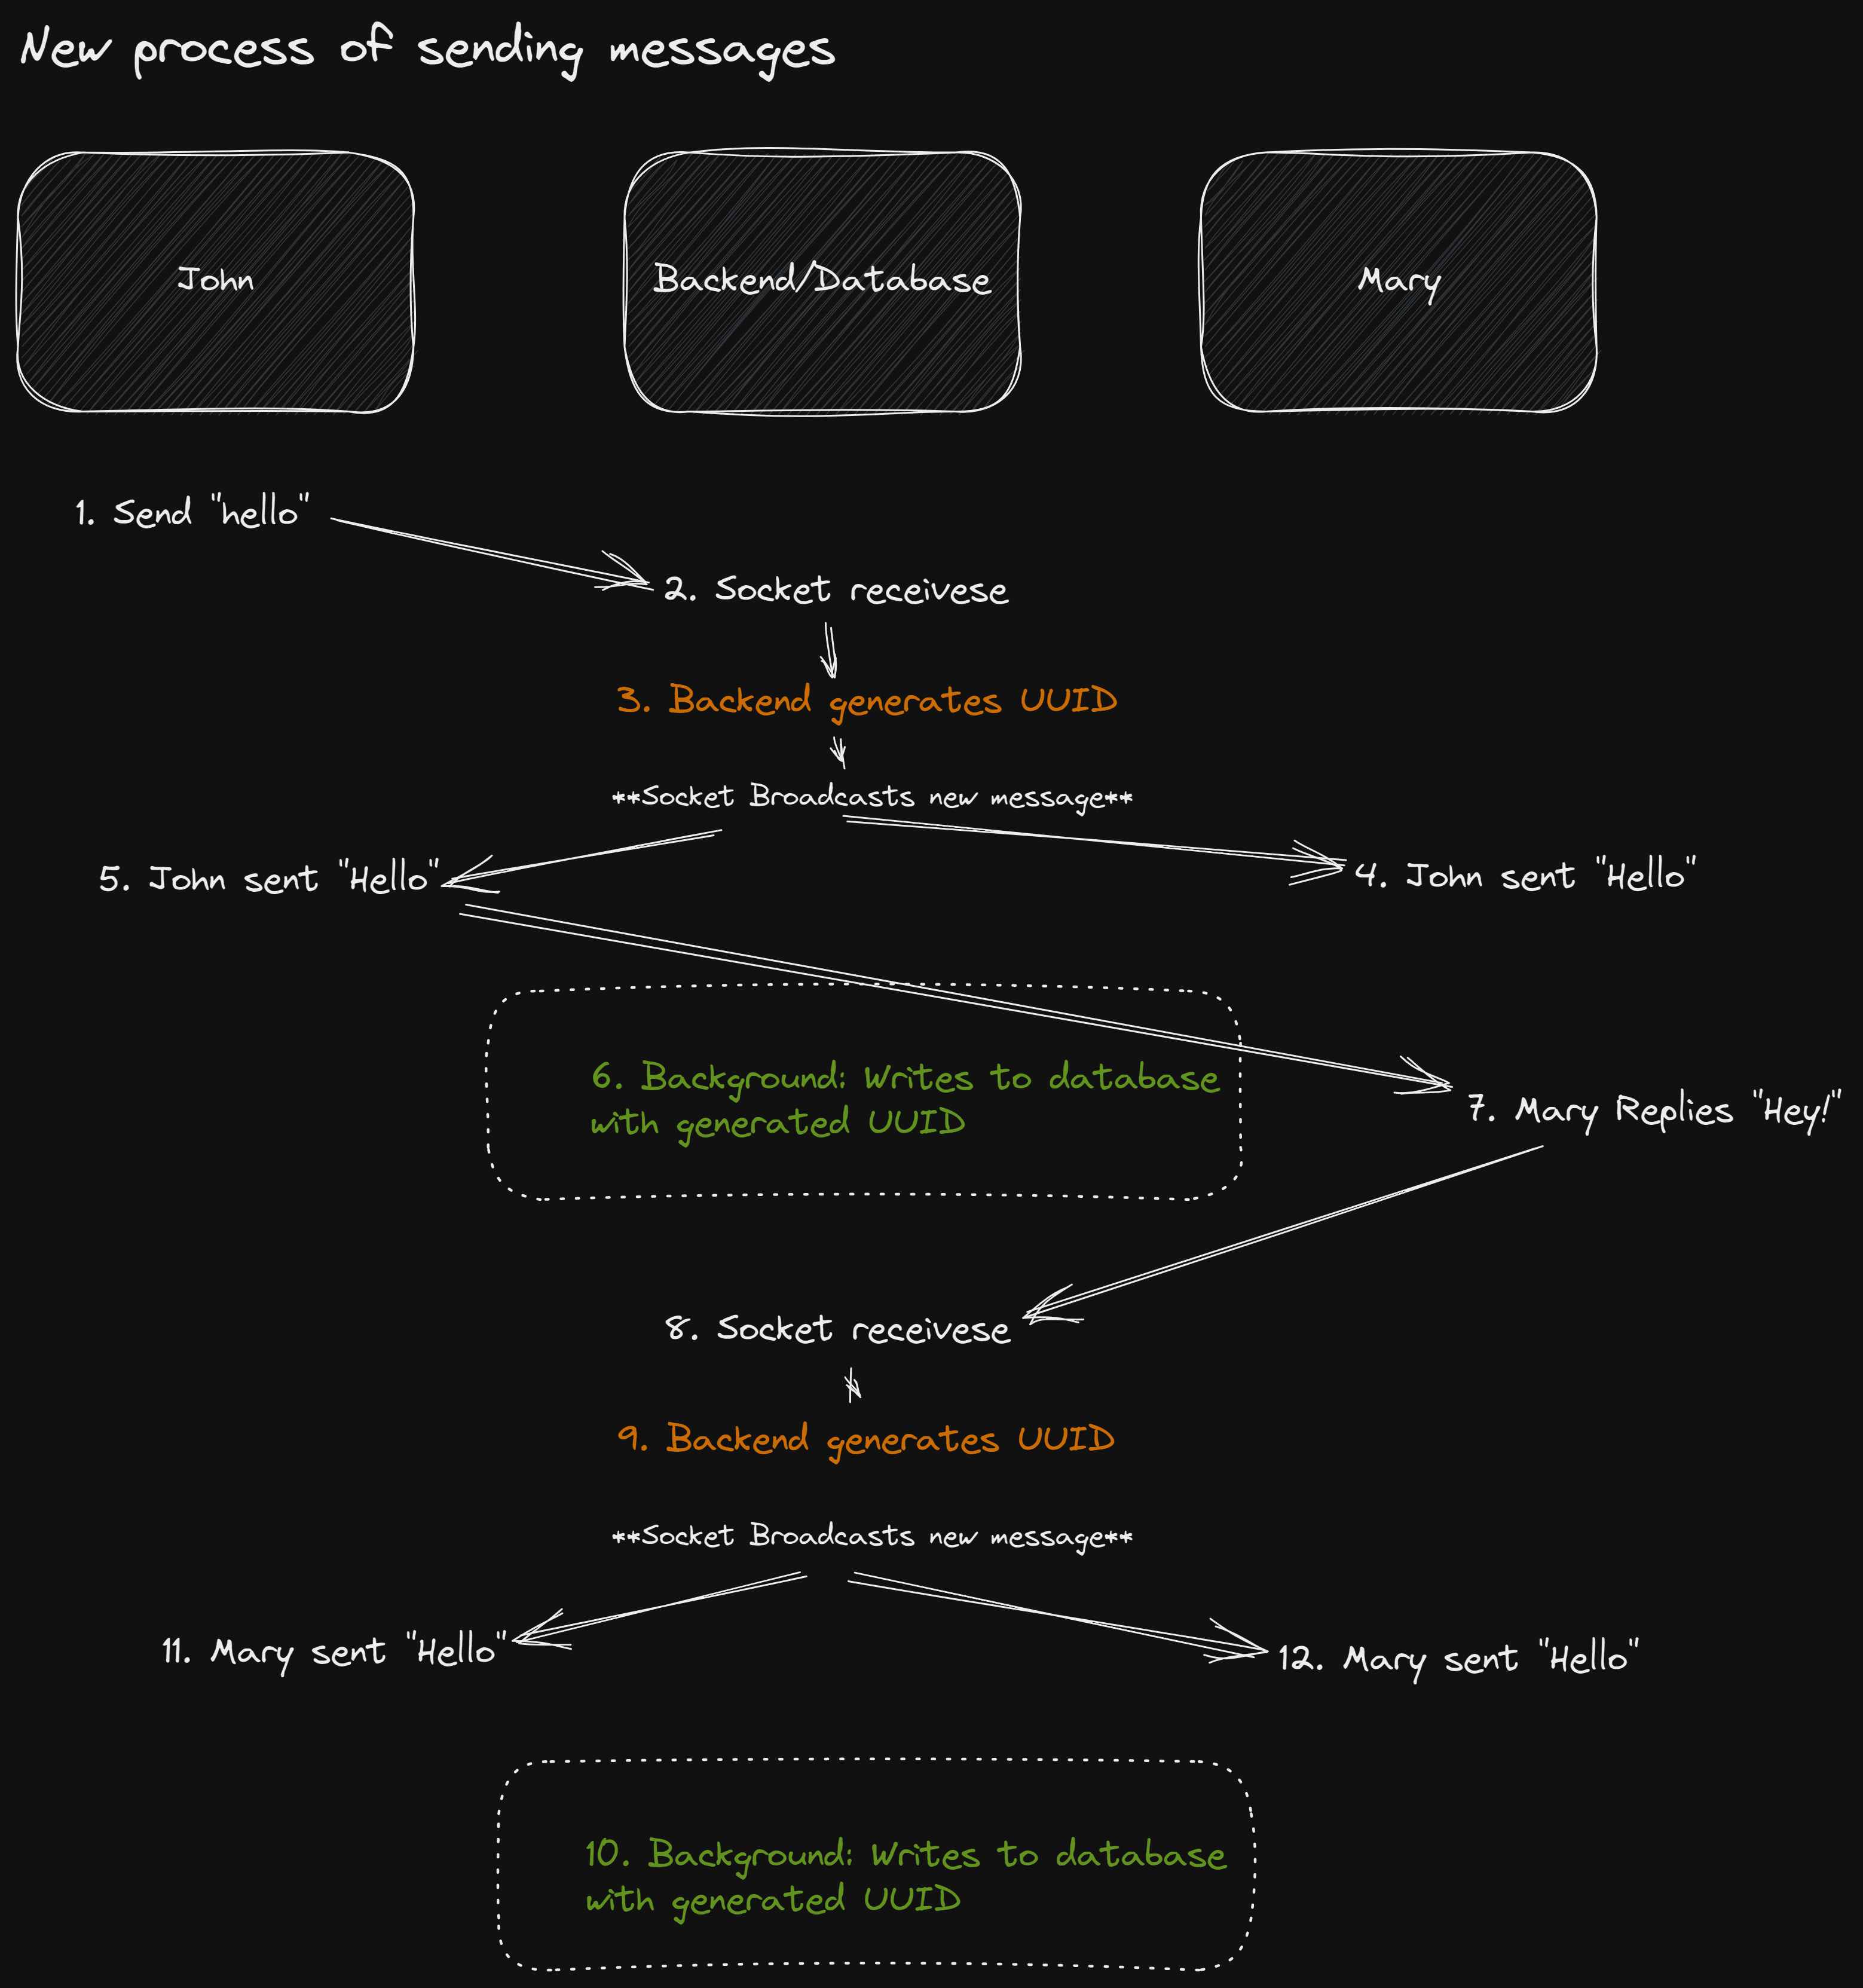
Note that the brown part is what changed and the green part is the background processes.
Using this new method. I can keep that real-time communication by the message with the ID broadcasted back and then have it written to the database in the background. I do not need to wait for the database to write!
Authentication over Socket.io?
To send your JWT Token and as part of every WebSocket request
First, make sure that your initialization of the client Socket.io passed it's token.
io("http://localhost:3030", {
    auth: {
        token,
    },
});
At the backend...
io.use uses express' middleware pattern. This snippet below is of the index.ts server file and it's not part of any event handlers.
io.use((socket, next) => {
    // This token is part of the auth.token sent above
    const { token } = socket.handshake.auth;

    if (!token) {
        return next(new Error("Authentication error"));
    }

    const verifiedData = JWT.verify<PlayerIDObject>(
        token,
        process.env.JWT_SECRET!
    );

    if (!verifiedData) {
        return next(new Error("Authentication error - cannot verify token"));
    }

    socket.data.player_id = verifiedData.player_id;
    next();
});
Accessing the "player_id" in your listeners is as easy as...
const selectTruthHandler = async (obj: RoomIDObject & PlayerIDObject) => {
        // ...
        const current_player_id = getCurrentPlayerID();

        // Note that the data.player_id we did above is part of the socket object now!
        if (socket.data.player_id !== current_player_id) {
            // ...
        }
}
As you can see above, you can use JWT to have authentication as part of your Socket.io application to process if the user can have access to your sockets or not.
This has helped me to
Disallow unauthorized "continue" turns in the game if the event is not received by the current player or the party leader.
Disallow getting unauthorized information about a player.
Disallow random people from joining rooms (someone using a POST request and etc.)
End-to-end encryption of messages
As a programmer, my top priority is ensuring the security of my programs and systems. I understand the potential consequences of security breaches and take the necessary steps to protect against them.
I learn this stuff either as part of my curriculum at school or as self-learning.
Asymmetric Encryption
I learned about the concept of Asymmetric encryption as part of an elective in school called "Cybersecurity Essentials" and how it is an end-to-end encryption system. One particular word that pops up in my mind is "RSA".
What is RSA?
RSA is a widely used encryption and digital signature algorithm. It is named after its creators, Ron Rivest, Adi Shamir, and Leonard Adleman, who developed it in 1977. RSA uses the mathematical properties of prime factorization to encrypt and decrypt messages, making it a popular choice for securing sensitive data. The algorithm has been widely adopted in a range of applications, including securing online transactions, encrypting email messages, and providing authentication for users accessing networked systems.
Why was RSA my choice?
It was my choice because mainly it has a private and public key, and its asymmetric!
On my way to make messages end-to-end encrypted.
I make up ideas on how do I make messages encrypted in-store and in transit and I made the data visualization below.
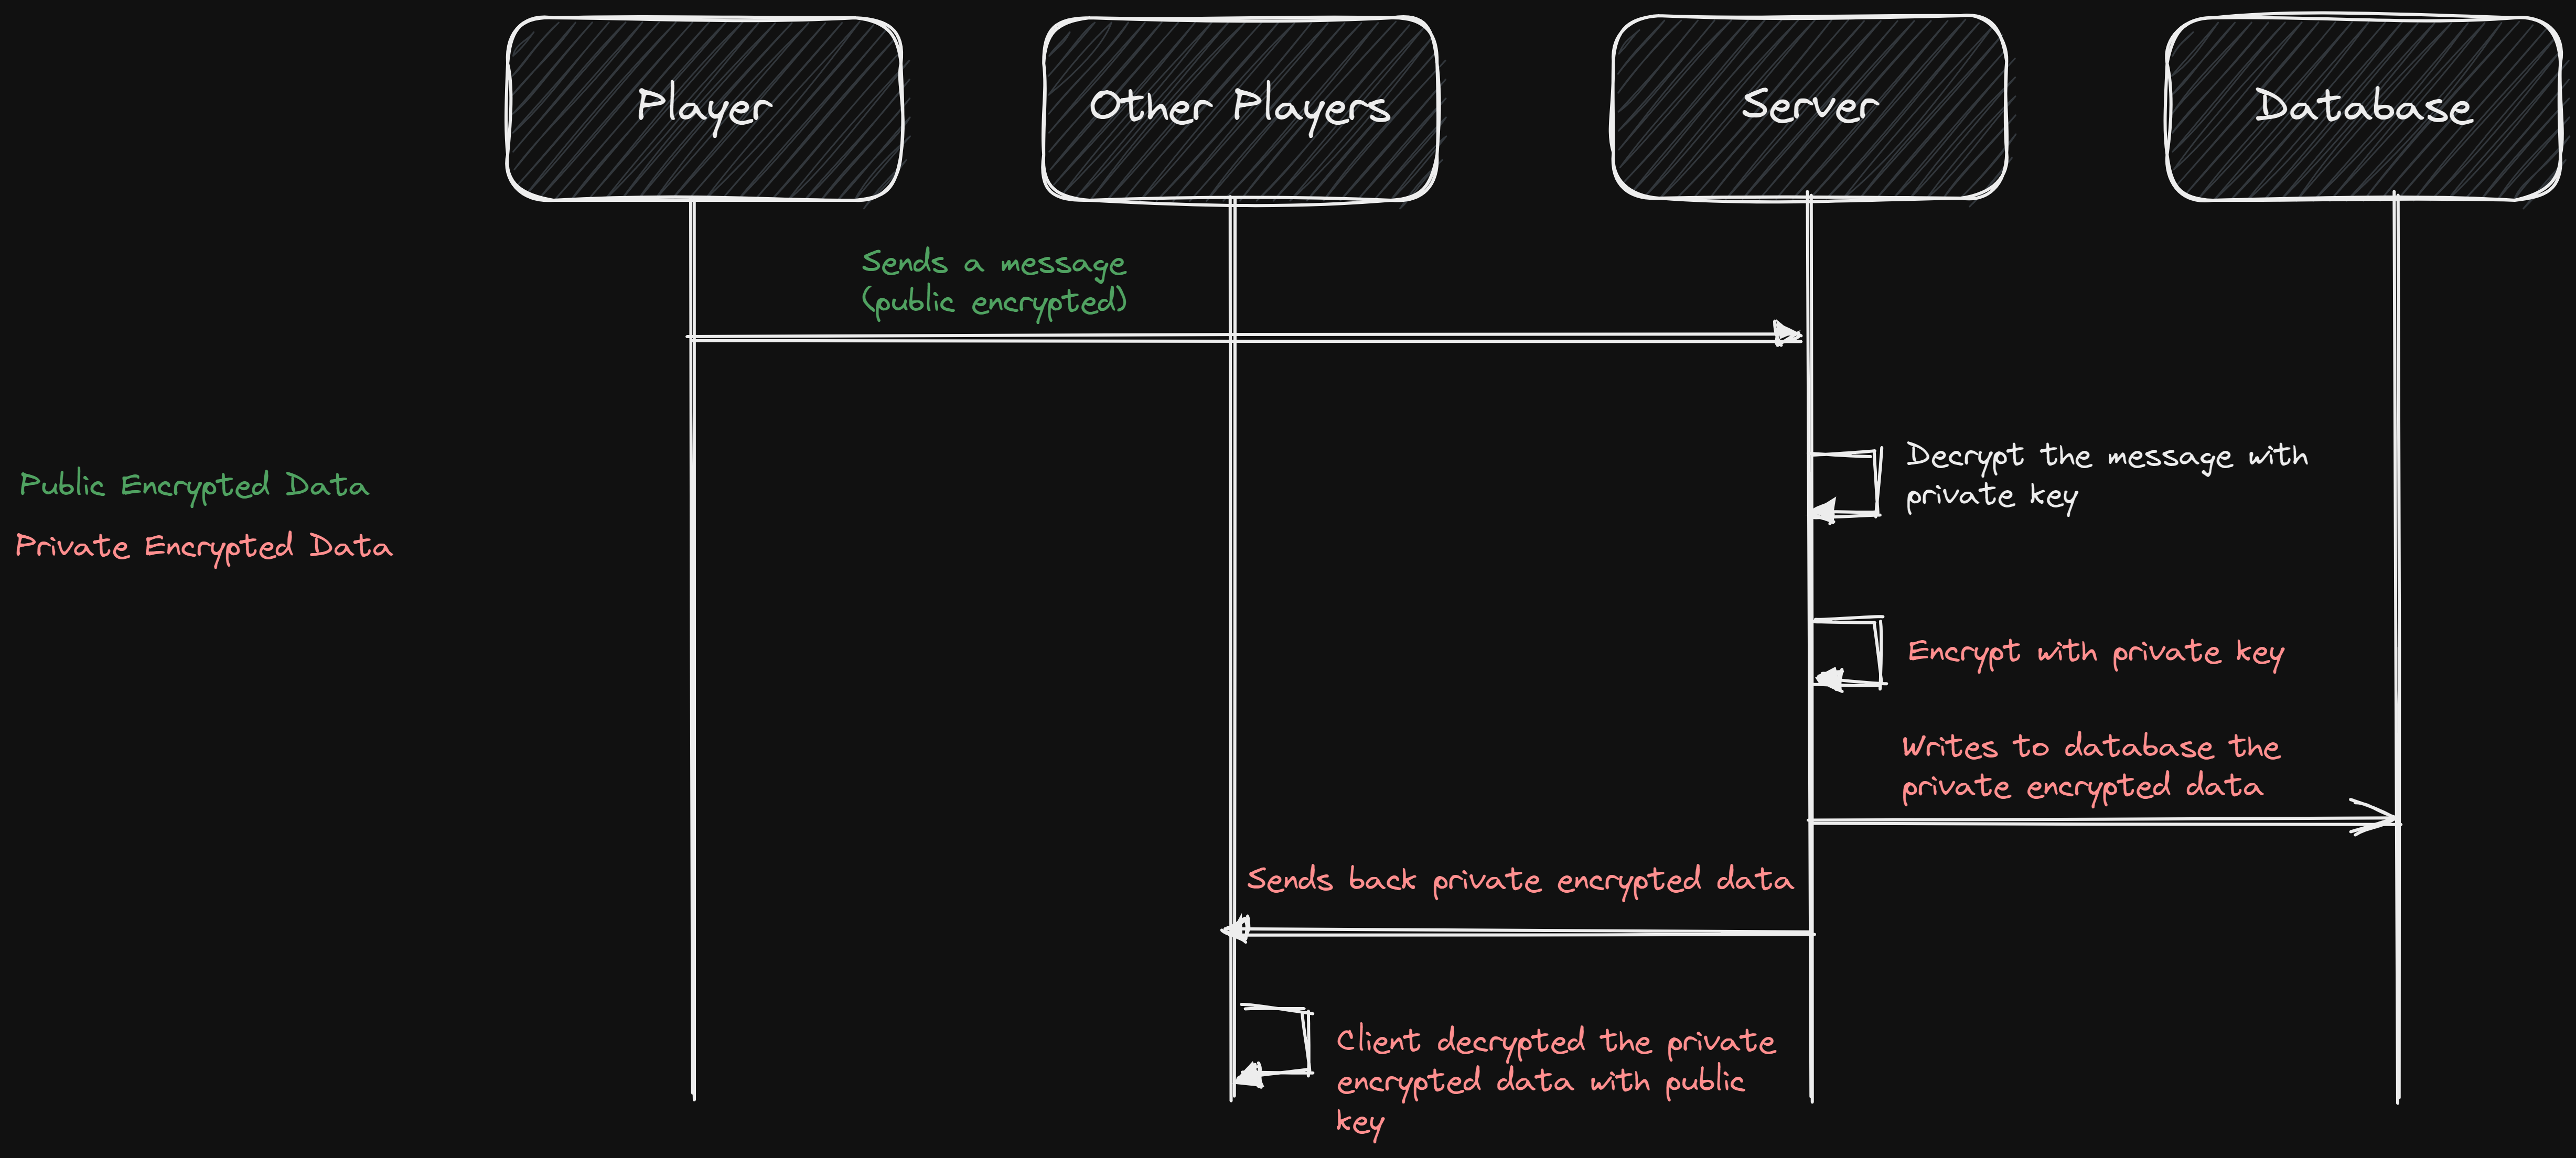
The main points are
All messages in transit from the user to the server are encrypted using the room's public key.
All messages in the database is encrypted using the public key. (The backend decrypts the public key encrypted data with the private key)
All messages in transit from the server to the user are encrypted using the room's private key.
The client (or user) decrypts any new messages from the server using their public key.
Result
All messages are end-to-end encrypted
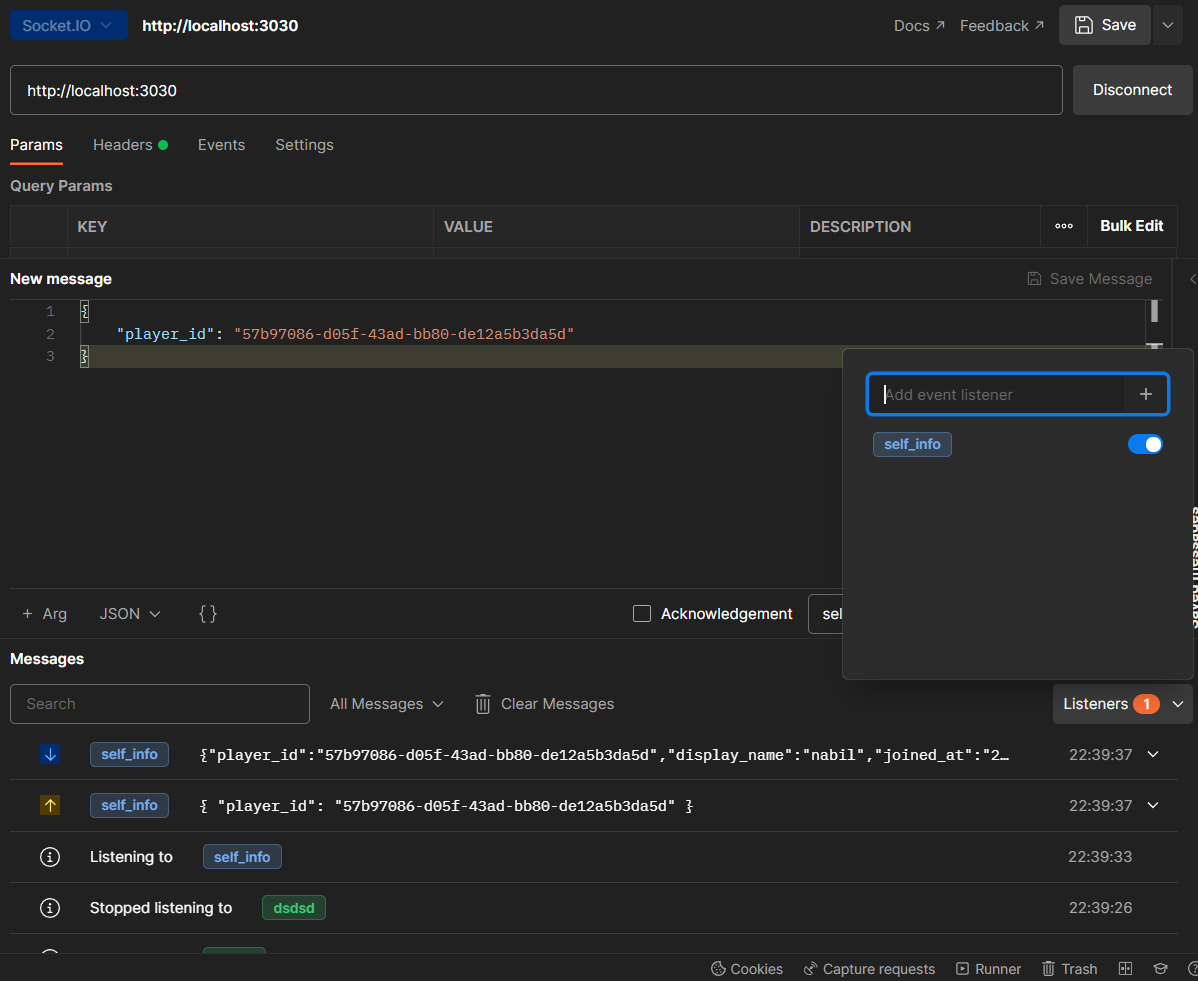
Debugging Socket.io using Postman?
Postman recently introduced the ability for us to debug Socket.io events just like how we always use Postman to debug our REST API Endpoints.
I am able to send and listen to events just and this helps a lot rather than manually making a request everytime.
Conclusion
In conclusion, I learned a lot while developing my first ever WebSocket-powered game. I learned the importance of thinking about scalability and the benefits of using a separate backend. I also discovered the power of using TypeScript and socket.io together, which greatly improved the maintainability of my frontend and backend code. Finally, I learned the value of testing your application after deployment in order to identify and address any performance issues. Overall, I found that this project taught me many valuable lessons and I am excited to continue exploring the world of web development.
Special thanks
I would like to extend a special thanks to Jaslyn, Xuan Rong, and Windy for playing with me after deployment. Their feedback and testing helped me discover some game-breaking bugs that I was able to fix. Their support and encouragement made this project a success and I am grateful for their contribution. Thank you!